Friday, December 30, 2011

Periwinkle Video


Periwinkle was designed and built by me for her owner, John Shrapnel. She is a long, lean boat with very fine sections up for'ard to help her get through a head sea relatively easily, and without making her crew too wet. Towards the end of the video you can see how the fine entry allows the water to peel off the side of the boat rather than flying into the air to be blown over the occupants. The plank laps associated with the glued-lapstrake (clinker) construction also help tremendously in knocking the water down.

Although she is 17ft long, Periwinkle is actually a smaller boat than she looks, and she needs to be trimmed properly to get the best from her - she doesn't like weight in the bow, but all boats are compromises, and in this case the advantages described in the first paragraph make up for the attention needed regarding trim. In the video, John Shrapnel has her longitudinal trim perfect, sitting on the wide and comfortable seat just forward of the expansive aft deck and buoyancy compartment.

Large aft compartment and buoyancy/storage compartment

Room for sleeping, and note how the aft deck hatch is on the centreline, so even if the lid is open, water will not flood in during a capsise
The following video was shot on the east coast of Australia, at Caloundra, Queensland.


You can see more information about Periwinkle on my website here and here and here

Thursday, December 22, 2011

Whimbrel Yet Again - Two Comments


Robert has followed-up on the previous couple of comments: -
Ross, since you see the utility inherent in the slot-top option and go so far as to state you would thus modify Whimbrel for your own use, would it be feasible to offer an additional sheet in the plans to make this an option?

Then there is that magic number I was waiting to see... the hull weight. I know more than one person is eyeing Whimbrel as a possible Everglades Challenge option. I do hope the actual number is "significantly reduced" as you believe. The Core Sound 20 finishes out at between 500 and 600 pounds sans gear, no cabin of course. Time will tell...

Well, I have to admit that I haven't done a full "weights and moments" calculation on Whimbrel. What I did in the previous post (with full disclosure at the time) was to take the total volume of plywood in the boat, multiply the volume by 600 to determine the weight of the ply in kilograms, and then I simply doubled it to account for timber components, glass, epoxy, fasteners, rig etc. This is totally unscientific, but I believed it to be conservative. What is more the selection of 600 kg/cu.m was also conservative, as we are able to obtain good quality marine plywood here which has an actual density of 420 kg/cu.m. The reason that I used 600 kg/cu.m as the figure was to account for the variability in the actual weight density of plywood supplied by the retailers. There is a retailer in this country selling BS1088 plywood which is advertised as being 430kg/cu.m - but when tests were conducted locally on actual samples, the density proved to be around 600 kg/cu.m!!!
If one was sure of having 420kg/cu.m ply, and even using the conservative doubling system that I described, the weight of the boat (including decks and cabin) could be as low as 220kg/484lbs.
I'm sure that the Core Sound 20 is an excellent boat, but she is a different vessel from Whimbrel. Firstly, Whimbrel has a full cabin, lots of built-in compartments, a self-draining cockpit, and a tabernacle. In addition, I designed Whimbrel to comply with the scantlings rules as laid down by Dave Gerr N.A. who is currently the Principal of Westlawn. as far as I can make out from my own study and from discussions I've had with a well credentialed Westlawn graduate, Dave Gerr's scanting rules are conservative in comparison with ABS standards - in other words, if you build to Dave's rules, the boat will be stronger and slightly heavier than required. I am very happy with that!
One of the things I had in mind when I drew Whimbrel was that I wanted a solid little ship which would last a lifetime. As you are probably aware, I hold the work of Phil Bolger in very high regard, but I was mildly concerned to discover that a Micro built to specification was somewhat flimsy. For example, you can push the side panels in and out, and when walking around on the cabin top it is necessary to place feet near frames, bulkheads or other supported areas, because the 6mm/1/4" plywood (from which the entire hull is made) flexes alarmingly.

Whimbrel has 12mm/1/2" panels on the bottom, 9mm/3/8" ply on the topsides, 12mm/1/2" on the cockpit floor, cockpit seats and cabin sole, and the cabin top is made of 6mm/1/4" on 50mm x 20mm (2" x 3/4") longitudinal stringers on 200mm spacings or less. This is a rugged "tugboat-tough" boat and not a light-weight daysailer.

Yes, I will do a sheet covering the simple option of a "slot-top". One could easily stand against the forward end of the cabin and reach down into the anchor locker and deck hatch.

Rick Hayhoe has written back: -

<> <><>
I went back over images I have and could access of scows among American watercraft, where they were used in the Gulf of Mexico fishery and for transport of timber, coal and other bulk cargo along the US west coast. I find, contrary to the opinion I expressed earlier regarding Whimbrel, that most or all of them have the bow transom terminating at or near the waterline. They were, of course, coastal and inshore craft, but they still would have met severe conditions at times. However, all of those were much larger vessels than Whimbrel, with displacement in the tens and hundreds of tons, with vastly more inertia in meeting chop or steep waves, able to punch through any but the biggest waves but hopefully able, while plying their trade of coasting, river transport or inshore fishing, to make shelter before such severe conditions arose. Their hullforms, like Whimbrel, were determined by their function, with priority over seakeeping, often for the benefit of operating in shallow water, taking the ground at low tide and carrying large volumes of deck cargo. In a boat the size of Whimbrel I would still find it safer to follow the design habits of one of the peoples with a long tradition of scow bowed small craft, either the Scandinavians, who invariably got their open water round bottomed prams' profile and buttock lines well up out of the water before they terminated them in bow boards, or the Asians, who on smaller craft either rolled the bow boards back to a very low angle of attack, like a garvey but much narrower, or built them with narrow stems flaring into transoms well above the waterline, or some of each. Still, I want to make it clear that I admire Ross's Whimbrel design, have since I first saw it, and I understand how the original client's parameters resulted in the outcome. The boat is meant to be used as a camp cruiser, not a passagemaker, so the design is defensible as Ross puts it. That said, I'd still make what I consider better use of scarphed whole and half-sheet lengths of marine ply and make its shout a bit longer, thus narrowing and raising it, while keeping all else the same. His rig, accommodation and use of leeboards are a winning combination on such a small craft, and the accommodation and applicability of leeboards are both facilitated by the scow bowed hullform. It's a very neat solution to a nettlesome set of design parameters, which I like a whole hell of a lot better than solutions to similar parameters by some others who shall remain unnamed.
Rick Hayhoe
I thank Rick for his comments, and given that I have already responded to his initial comment, and because Rick has written so well in his second piece, I don't feel the need to reply further. However, I hold Rick's opinion in high regard, and I have therefore been moved to continue with hull modelling experiments with longer hulls which carry their transoms higher and less wide. Unfortunately, my time is so limited (it is the old 'One-Man Band' thing again - I'm trying to be a boatbuilder, a designer, a blogger, an email respondent, a magazine writer, and a retailer of components all by myself - I just can't get it all done, I'm afraid), that the initial modelling attempts need more time devoted to the detail.

Foot Brace in First Mate


All of the hull panels in First Mate, including the narrow flat bottom panel, are made from 6mm/1/4" marine plywood. Wayne Jorgensen, who helped build the first boat from the design to hit the water, expressed some concern about the stiffness of such a thin bottom panel. I wasn't particularly concerned, as the panel is only 856mm/34" wide at the widest point, and is very well supported by the centreboard case, 6 bulkheads and frames, and most importantly, by a 66mm x 19mm (2-9/16" x 3/4") external keel batten firmly glued to the bottom of the boat. In addition, I sheathed the boat I'm building with 200gsm/6oz glass cloth in epoxy.

In a beach-cruiser, light weight is of critical importance for a solo sailor, and I also wanted to economise on plywood, getting the most possible out of standard sheets - it made sense to use a standard thickness for all panels. Having said that, there is nothing to prevent you from using 9mm/3/8" ply for the bottom panel if you wish.

As part of the design, I drew an adjustable set of foot braces to make rowing more efficient, and also to give something against which to lock your heel to prevent sliding across the boat when heeling under sail. These foot braces gave me yet another opportunity to stiffen the bottom panel. Following are a few images of the set I've just installed in the First Mate which I am (slowly) building: -

An overview showing how the side rails of the braces are glued to the bottom of the boat, and extend forward and aft to teminate against the bulkheads. This is very important, because terminating a stiffner in the middle of a sheet of plywood risks the formation of a crack in the plywood eventually. Note how the side-deck knees in the background are tapered and lead all the way down to terminate on the chine between the bilge panel and the topside panel.

Blocks to locate the foot brace. In this photo the longitudinal rails had been glued into position, but the blocks were just dry-fitted. They were subsequently glued to both the rails and the bottom panel

Three photos showing the foot brace dropped into the three different locations. The longitudinal rails are rounded down at the forward and aft ends to allow drainage of water - sort of like an open limber.


With these longitudinal foot-brace rails in place, along with the external keel batten on the other side, the maximum un-supported width of the plywood and external glass sheathing is about 210mm/8-1/4"

Wednesday, December 21, 2011

Bow Transom and Cabin Top on Whimbrel

The matter of the bow transom on Whimbrel has stirred up some discussion over the last couple of days - see this post for information.


In the drawing above, you may be able to see that I've drawn in three separate waterlines with accompanying displacement number attached. The upper waterline shows the displacement (952kg/2094lbs) with the water just touching the lowest point of the bow transom.

Here is an interesting comment from Rick Hayhoe: -

Phil Bolger sometimes said or wrote the strangest things. I have to point out the fact that you don't make the boat faster in any practical sense by drawing out the waterlines to the full LOA, leaving the boat just whacked off in a plumb scow bow that touches the water, or nearly so, at rest. What you do is create a monster that will misbehave in the slightest seaway and almost any wind.

I very much like the concept Ross is promoting in Whimbrel. I've admired the design since first seeing it almost a year ago, but I certainly would make the boat eighteen inches or two feet longer at the forward end without changing anything else, getting that scow bow up, well out of the water and raked a bit more. Just imagine for a moment the danger of broaching on a downwind point of sail with following sea and opposing chop set up by a river's outflow agains tide and wind, with that scow bow slamming into the chop and the following waves trying to push your stern ends around. Those are conditions one can expect to encounter routinely when entering many estuaries, let alone the conditions encountered while struggling in a squall or making for home in suddenly rising stormy weather.

Living as I have for many years in Asia, I have had the opportunity to look closely at a variety of scow bowed Asian sailing and motoring craft. Generally, you find that either the bow transom is raised well above the LWL or it is raked well aft. Some are built with a profile like a garvey, that is, raked and rounded, cross planked, to recede as they approach the LWL. In most cases, some compromise has been made in order to reduce the impact of the transom or scow bow against wave and chop.

Bolger was a brilliant designer, but he had a tendency to paint himself into the damnedest corners, and he was stubborn enough to stick to his pet theses no matter what. You have to admire most of his work, perhaps even his stubbornness when he was right, but you'd better take some of his philosophizing with a grain of salt. Boats move through a constantly troubled and dynamic pair of fluids that make up one of the least forgiving environments on our planet. You flout at your own risk the limits and dangers they pose.

Rick Hayhoe


I estimate that a hull built from 600kg/cu.m plywood (a conservatively heavy estimate based on the weight of all the ply in the boat and then doubled to account for timber components, glass, epoxy and rig etc) would weigh about 314kg/691lbs. Add to that 240kg/528lbs for crew and gear and you end up with a displacement of 554kg/1219lbs fully loaded displacement. This is a conservative figure which I believe would be reduced significantly in reality.

Below is a perspective and a lines plan showing Whimbrel at the maximum displacement in salt water, and I'm reasonably happy that the forrard sections are buoyant enough and shaped well enough (in terms of rocker, distribution of volume, and chine shape) to prevent the disasterous behaviour that Rick predicts. I may well be proven to be wrong, but after having modelled a number of other hull shapes at 18' 6" length on deck and with a raised, smaller bow transom, I have elected to stay with the design as drawn at 17' length with the big bow. Storage and building space is a real issue for many people and I was trying to get a roomy and capable boat without excessive outside dimensions. There is no such thing as a perfect boat!

By the way, the bow transom is set at 65 degrees to the waterline, which is a long way from being plumb.

A perspective of Whimbrel showing the waterline at maximum displacement of 554kg/1219lbs in salt water

Whimbrel lines plan at 554kg/1219lbs displacement

Robert relied to the post yesterday regarding his question about sleeping space: -

Ross, I can see why you were taken with the concept. It sounds as if much thought has been given the design. I appreciate the amount of interior room designed in. Is there to be a slot top or more enclosed cabin? If designed to be totally roofed over, could the cabin be modified to add a pass through slot? It is very hot in Florida much of the year and the slot top cabin seems to offer greater forward access.

This is an interesting subject, and I had been giving it a lot of thought myself. You see, I can't stop fantasising about building boats for my own use, and I'm quite taken by Whimbrel. While dreaming of the boat, I had decided that I would modify the cabin top if I built her for my own use, and that I would use a Birdwatcher-style slot-top. However, thinking that the majority of the buying public would prefer a conventional companionway with a sliding hatch, that is what I drew.
My opinion is that the slot-top is a superior option for this size of boat, allowing for better ventilation, unlimited headroom, and secure footing right up to the mast.

Just for interest - no plans available in any form - here is a twenty-foot boat I drew up for fun, to visualise a full Birdwatcher cabin on a nicely shaped conventional hull. She has got very firm bilges so that a person can sit comfortably out at the sides.


20'x 6'

Tuesday, December 20, 2011

Whimbrel - Two More Questions

Two comments have just come in regarding Whimbrel - one via the comments function and one by email.

First came from Robert: -

Ross- I'm following Whimbrel developments with keen interest. I have long considered Jim Michalak's Frolic2 based on Gary B's Everglades Challenge success with the design. I live 30 minutes from the start of the EC and hope to enter in the near future.

My only concern thus far is the length of the cockpit and cabin floor. Your drawings show the opportunity for one to stretch out in each spot, but I am 6' 4" tall. Can you share approximate lengths of those spaces?


The cabin and cockpit arrangement on Whimbrel owes much to the brilliant design concept that Phil Bolger employed in his Micro. By that I refer to the cabin space and the cockpit "overlapping" longitudinally so that a person sitting or lying down at the forward end of the cockpit is actually positioned above the legs of a reclining person in the cuddy-cabin - in much the same way as happens with quarter berths in larger cruisers.

You can see here how the accommodation spaces overlap
The cockpit and cabin space is unusually large for such a short boat, due to the 6' 8" beam which is carried well forward because of the pram bow. In fact, there is space aft for a substantial aft deck and associated buoyancy/storage compartment. This aft deck will also allow for the use of a self-draining outboard well similar to the ones I've used on a number of my other designs.

Periwinkle on launching day showing the self-draining outboard well. The camera had a wide-angle lens making the well look a bit larger than it is in the flesh

Back to Robert's question...

The longitudinal space available in the cockpit, measured between the main bulkhead and the forward bulkhead of the aft deck i.e. the total length of uninterrupted sleeping/sitting space is 6'ft 8-9/16". In the cabin, there is 6' 6-5/8" of bunk-space with an additional 11-1/8" of clear space between the forward end of the bunk and the forward bulkhead of the cabin giving 7' 5-3/4" total. There are compartments leading forward from the end of the cabin for stowage - two accessible from in the cabin, and two from on the deck which drain overboard - used for anchors etc.

Another comment came from Wayne Jorgensen: -

Ross
another quick question re Whimbrel's pram bow. I've spent some time watching Sabots trying to punch into a chop- to the detriment of their speed and handling. Wont there be the same issues with Whimbrel's near vertical pram bow? Scandinavian prams lift their bows much higher so this is not really an issue with them but then they are not live aboard cruisers either.

Regards
Wayne


I agonised over this very matter when I was doing the initial hull modelling. The competing factors were;
  • maximum volume and reserve buoyancy on a given LOA;
  • maximum speed (in smooth water) from a given LOA;
  • lack of annoying wavelet noise under the bow while at anchor;
  • a chine-line (in body-plan view i.e. viewed from bow and stern) which would produce the minimum cross-flow and eddy-making.
I like the Scandinavian-style pram designs with their bow transom carried high and narrow - you see the same thing on some sampan designs. The problem is that the length of the boat would have to be increased significantly if one was to retain the required shape and buoyancy, just as would be the case with a sharp bow.

It was Phil Bolger who pointed out that a vertical transom gives the maximum waterline length for a given length on deck. He also said that a vertical transom can dig into waves and throw spray - but he then went on to say that by raking the stem forward it would reduce the spray and the digging tendency, but would make the boat longer. So why not pull the waterline length out to match the new length on deck with a vertical transom and get even better performance? Here is one of his several comments on the subject: -

"Raked transoms make a faster boat less badly stopped by waves if they are raked out from the given bottom length, but in that case the boat would be better still if the waterline were carried out to plumb transoms at the new overall length...." (Boats with an Open Mind, International Marine 1994)

What I could say to make myself feel justified is to say that Whimbrel was a 17' boat with a nicely raked bow transom, but I pulled out the bottom length to produce more volume and speed...... But no, I drew what I thought was a good compromise for a fellow who wanted a maximum LOA of 17'. The customer went overseas and had to cancel the design, but I was so taken with it by that time that I decided to finish her off as a stock plan. That is why it has taken so long for me to finish, as I only work on the drawings occasionally.

Monday, December 19, 2011

Whimbrel Questions

Mike has written a comment asking a question about Whimbrel:-

Ross - quick question on whimbrel. Is she to be a pram/scow bow craft? If not, could the plans be fairly easily amended for a pram bow option? A pram bow, coupled with the leeboards would sure make a roomy little craft for the overall length

Yes, Mike, Whimbrel is a pram, and was designed that way deliberately for the following reasons _
  • Greater internal volume and stability for a given length. Alternatively, you could say that for a given volume you get a much shorter and more easily stowed boat. If she was faired up as a sharp-bowed boat of the same volume and stability, Whimbrel would need to be about 21 feet long;
  • Better hull shape to take leeboards - the use of leeboards has many advantages, such as a completely uncluttered interior, and freedom from the worry of having a centreboard jambed in its case by sand, shellgrit and stones - a constant worry when beach-cruising;
  • Greater reserve buoyancy up forward. This is important when running off in a big sea, and is helpful considering the large sail area and forward mounting of the main sail and mast;
  • In flat water at least, better speed potential due to the chine shape allowed by the pram configuration. See previous post
Whimbrel viewed from the starboard bow
Unfinished working drawing showing inboard profile of Whimbrel. Don't be alarmed that one of the figures has his feet through the bottom of the boat - it is the only suitable figure I had to check head room!
Whimbrel sail plan, also showing the mast (dashed lines) in the lowered position, which is made possible by the use of a tabernacle. A tent can be rigged over (or hanging from) the lowered mast, so as to cover the cockpit and to provide shade to the cabin top.

    Tuesday, December 13, 2011

    Will First Mate Plane?


    A couple of days ago I responded to a question from Al Burke about whether Phoenix III and First Mate will plane. In my reply I confirmed that Phoenix III will definitely get up and plane, but I had to say that I didn't have direct experience with First Mate.

    Since then I have received an email from Wayne Jorgensen (an experienced and knowledgeable amateur builder). Wayne has more experience with First Mate than anybody I know, having been part of the two-man team which built the first boat to be launched. Here is part of his text: -

    Ross
    was reading your blog and comments on First Mate. I can assure you that she can plane with 3 scouts in her.
    I guess they would weigh as much as a very large adult.

    What I am very impressed about is that she can sail in very light breezes through to much stronger winds.

    Monday, December 12, 2011

    Little Egret under Construction


    John Hockings has started construction of the Little Egret I designed for him, and he is making spectacularly fast progress and doing a wonderful job. This is his first attempt at Stitch-and-Glue, although Little Egret uses a combination of S&G and traditional skiff construction. Here is a link to John's thread on the Woodenboat Forum - be sure to check all of the pages as the thread is already onto page two, and will soon be on a third page, I think.

    http://forum.woodenboat.com/showthread.php?139737-Little-Egret-an-Egret-style-day-sailer

    I'll be continuing to watch the project with great interest, as this boat is significant.

    Answers to a few comments

    I apologise for not having replied to the last few comments, but I've been snowed under with other duties and this is my first opportunity: -

    Rossco, Did Ross Trinder use 4mm or 6mm ply on his longer Water Rat? With my 9' Water Rat I used 4mm with a full length centre stiffener of 1/4" x 4" western red cedar ( from an old verical blind) plus some smaller ply pieces and a pair of heel pegs, between the centre stiffener & the chine.You can see these in the photos I put up in Duckworks Magazine forum under "Water Rat".The bottom seems quite stiff enough with these, plus of course,the fore & aft facing seat mounting cleats. My Water Rat weighs only 17kg,which is very light,so using 6mm will probably increase it to about 25kg which is still very portable. Would "rowerwet" be better advised to use 6mm if he intends surfing his boat? Al Burke
    Ross Trinder used 6mm ply on his long version of Water Rat and she turned out to be about 28kg (62lbs) which is quite heavy. However, he said that he used locally-sourced "Pink" BS1088 ply. In Australia "pink" ply normally means Pacific Maple (Meranti) or a Malaysian hardwood like Keruing all of which are quite heavy. If built from 6mm Gaboon (Ochume) the plywood weight of all of the panels in a 10.8 ft Water Rat should weigh 10.5 kg (23 lbs). I'll leave it up to your judgement to work out how much the timber, glass, and epoxy would weigh.
    As Al Burke points out, the boat can be made from 4mm material, but stiffeners will be required in strategic locations. The stiffness of a panel increases (and decreases by the cube of the thickness, so 6mm ply which is supported around all edges is 3.375 times the stiffness of the same panel in 6mm!
     Here is another one from my mate, Al: -

    Rossco, By way of a general comment on both First Mate & Phoenix3,I have been impressed with the speed Paul Hernes achieves in the videos of him sailing in a stiff breeze & the ease with which he handles the boat.I know the sensation of speed appears greater when close to the water,but he is ceratainly clipping along. My question is:- are both designs able to break out & plane? Al Burke
    Yes, Phoenix III can break out and plane. In the following photos you can see John Shrapnel sailing Paul Hernes' boat on a good day with a deep reef tied in the mainsail. This is a good demonstration that traditional rigs can drive a boat fast! I haven't had direct experience with First Mate yet, but I'd expect her to be as good or better due to being wider at the rail and easier to hold down. Both boats have substantial rocker, so they sit bow-high when planing, but the result is not extreme.


    From Shaun come two nice comments: -

    Your photos and step by step explanations are a huge selling point for me. They keep bringing me back to the blog. Not only are you highlighting your designs but are show casing the workmanship that goes into turning out a beautiful boat. I am hoping to make my first build a Flint with sails. I started a bit backward and have built some spoon oars first to get the hang of epoxy. Cheers, Shaun
    Nicely done photos and commentary, makes me believe I could replicate the process. I am interested in trying some bird's mouth oars. Do you include such plans with your Flint design? Cheers, Shaun

    Shaun has said that he has started backwards by building oars first, in order to gain experience with epoxy. I think this is an excellent approach for an inexperienced builder and I encourage the method. The other thing to do is to build a very small tender of simple canoe so as to get the hang of the processes. In my First Mate plans I include patterns for a simple galley box which is made as a mini-stitch-and-glue project.

    No, Shaun, there are no Bird's Mouth spar plans for Flint, as the spars are so short and slender that the weigh saving does not justify the trouble. In fact, the spars for Flint are parallel-sided and can easily be made out of a wide variety of materials including alloy tube and carbonfibre tube. I'd make them from timber - it feels nicer to the touch.


    I'm currently finishing off the Whimbrel plans, but due to workload the process will take about another month, I think. I like the boat very much indeed, and she should be a simple project for someone who has some experience.


    Thursday, December 8, 2011

    Tapering Mast Staves - My Approach to the Problem

    Increasingly, people are turning to the "Bird's Mouth" method for making hollow timber spars and even oars. I've written about various aspects of the system in previous posts - see here and here and here .

    Over the last week I've been preparing material for two hollow masts and I thought I'd show you my tricks for getting accurate tapers on the individual staves quickly and easily.

    Firstly, I machine the mast stave material down to the thickness required - on my plans, you will find that the thickness of the staves is annotated on the relevant plan sheet.

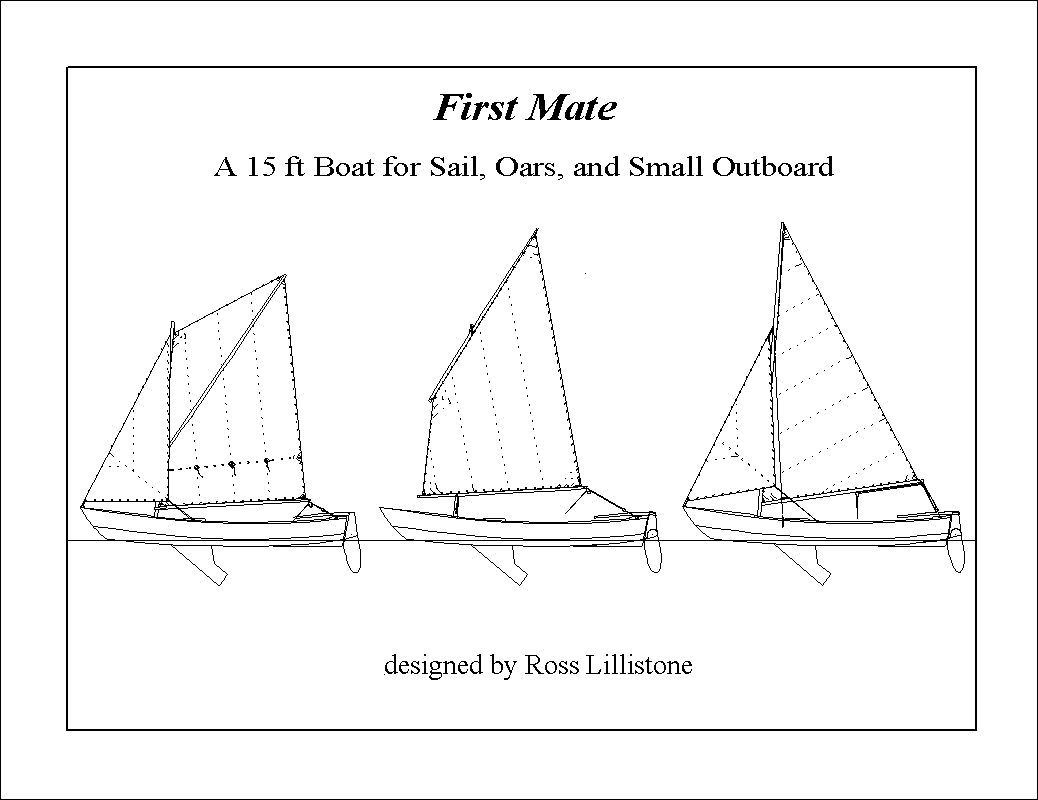
    This is one of the sail plans sheets from the First Mate plans. Shown on the drawing is the length of each spar, and the diameters at marked intervals along the spar. Also included is the thichness of the "Bird's Mouth" staves and their width at marked intervals. This takes much of the painful work out of calculation the sizes of mast components.
    After having machined the material down to the required thickness, I cutt eight staves slightly wider than the dimension at the widest point - I usually make tham about 3mm/1/8" or more wider than required. I then cut the "Bird's Mouth" cut-out as described in the earlier postings.

    Cutting the "Bird's Mouth" on the table saw.
    Once cut to a long, parallel-sided stave with a "bird's Mouth" it is time to cut the taper.

    Showing the principle for cutting the taper on staves
    My approach is as follows: -

    Marking divisions along on single mast stave. This stave will become the "master"
    At each division, draw a line across the stave, square to the long edge.
    Here is a small section of one drawing, where you can see that this mast is 3816mm long, with divisions at 553mm intervals (these aren't alway even, but they are clearly marked on the drawings. You can specify metric or imperial. In the middle of the photo you can see that at that point, the mast is 73mm in diameter and the figure in brackets shows the if the mast staves are cut to 28.3mm at that point the mast will come out at the correct total diameter after rounding (or you could leave it octagonal for less labour).
    More details taken from the drawing
    At each division, I mark the width of the stave, working from the bird's mouth edge so that the taper is cut off the flat edge. I find vernier callipers to be the most convenient tool for this job (and for many others)
    Once all of the offsets have been marked, I clamp the stave up against a straight-edge to keep it straight between divisions (this is very important) and I then draw a straight line from offset mark to offset.
    The Bird's Mouth side is clamped lightly up against a straight edge, and in the forground you can see how I have marked the amount of material which needs to be removed
    You can see that as you approach the tip, more and more material needs to be removed to achieve the required taper.
    After marking the taper line, I cut the excess material off using a bandsaw, but you could laso do it with a hand plane. The bandsaw is good because it gives a square cut if properly adjusted. Cut just clear of the line and finish up with a sharp low-angle block plane.

    Finishing off the cut with a low-angle block plane
    Once the first "master" stave has been completed accurately, I then lay it on top of the succeeding staves, holding both against the straight edge fo accuracy. Then, trace around the master stave to mark the remaining seven in succession.

    Marking the next stave by tracing around the master with a sharp pencil
    Another shot showing the marking of the remaining staves by tracing around the master.

    After this it is simply a matter of cutting and planing the remaining seven staves.

    To assemble the eight staves can be very difficult if you are working single-handed, as the whole bundle tends to collapse like a house-of-cards. In this series of pictures I am only doing a dry assembly, but it shows the trick I use to make things fool-proof.


    Staves are temporarily screwed to an octagonal disc of thick plywood of a generous diameter

    Staves are temporarily screwed to an octagonal disc of thick plywood of a generous diameter
    This procedure holds the eight stave in their correct angular relationship, greatly simplifying the assembly process. I then move to the far end and start clipping the eight staves together in a self-supporting bundle and put a temporary cable-tie on to keep things loosely in position.

    The far end clipped together and held with a cable tie....
    ...then I move along progressively adding cable ties. At this dry-assembly stage, only a few cable ties are required....
    ...until I get to the base, remove the temporary screws and the plywood disc, and clip the final bit together.
    After this I do things such as making octagonal mast plugs etc, and them pull the whole thing apart, apply epoxy, and glue it together for the last time. See the previous posts.

    Saturday, November 26, 2011

    Water Rat Developments

    My customer and friend, Ross Trinder from Toowoomba, Australia, has just launched the very first (to my knowledge 10.8 ft length Water Rat. Prior to this there had been a number of the original 9 footer on the water, but Ross' is the first 10.8 ft version.

    Ross Trinder's Water Rat 10.8 racked on top of his Green Island 15

    Jon Trinder, at 6' 2", gives some proportion to the boat.
    Jon seems a big fellow, but the 10.8 version sits high in the water
    Ross and Jon Trinder elected to instal a commercial seat
    Ross Trinder's beautifully finished Water Rat 10.8

    Al Burke has written a couple of nice pieces for Duckworks about his Water Rat here (scroll down to Water Rat) and here (again, scroll down to Water Rat).

    Al's Water Rat showing that even the short version can carry a load
    Al's wife, Rhonda, showing that the tumble home topsides make paddling easy even though the boat is wide. She is also showing that though Al is an expert pilot as well as waterman, she is better looking than him....
    As you can see Al Burke did a top-class job of this Water Rat
    Here is a photo of my youngest son, Steve (a long time ago), showing how stable the very first boat was. She was originally designed by my great friend, Doug Laver - I collaborated with the project, but the idea was Doug's and I still call her his design. Since the original, I've worked over the projections and some of the proportions, but as much as possible I've stayed true to Doug's original concept and shape.